Guidance Reading:
For the non-independent truck refrigeration units or
direct driven truck refrigeration units, How to install truck refrigeration units and how to install direct driven truck refrigeration units, and there are three different installation methods of truck refrigeration units which divided into
Front Mounted Truck Refrigeration Unit,
Under Mounted Truck Refrigeration Unit, and
Roof Mounted Van Refrigeration Units according to the installation location of the condenser. Before installing, please take care the follow notice.
★ Inspected before truck refrigeration units installation
★ Truck refrigeration units Installation process:
condenser installation → Evaporator installing → Pipes connecting → wire harness and wire slot installation → Pulley installation → Compressor Bracket and Installing The Compressor → Refrigerant → Trial run.
Inspected before truck refrigeration units installation
1. Please check whether the refrigeration units are damaged during transportation, and check if there are losing accessories.
2. Please check whether the received refrigeration units are in conformity with the model and configuration described in the contract.
3. Please check whether there is accessory that is omitted or wrong delivered. Please check that if all the truck refrigeration units spare parts are ready.
4. Please check that if the model of truck refrigeration units is suitable for the truck; whether its appearance & quality can meet the requirement.
Tips: Please timely contact the relevant stuff of our company if any of the above situation occurred, in order to avoid the influence of refrigeration units installation
Truck refrigeration units Installation process
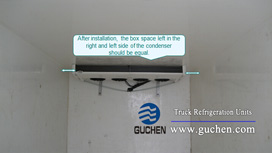
Ⅰ Condenser installation
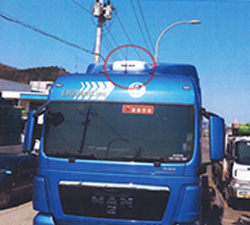
Front Mounted Truck Refrigeration Unit
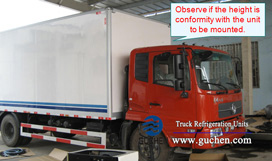
Installed the condenser in the front of the truck container is called front mounted truck refrigeration units. Observing the distance between the cabin and the truck container, as well as the height between the cabin top and the container roof, avoid that the cabin might be unable to upturning after installation. (The premise was that there is some cargo placed in the interior of the truck container)
If the height difference is too big, move the condenser downward appropriately when installing, in order to ensure the refrigeration unit and the vehicle look harmonious and beautiful, as a whole.
Under Mounted Truck Refrigeration Unit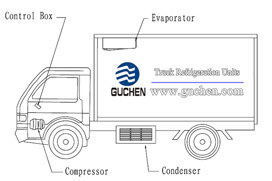
Installed the condenser under the vehicle chassis is called under mounted truck refrigeration units. The refrigeration unit should be mounted in the front or the middle of the vehicle chassis,because if it mounted at the rear, the refrigeration units would be bumped when driving, that this will lead to refrigerant leakage and other unnecessary lost.
When the condenser installed below the vehicle chassis frame, make sure the refrigeration units far away from the vehicle tire as much as possible, in order to avoid refrigeration units is damaged in case of tire explosion
Roof mounted condenser installing is situation for van, therefore called roof top mounted van refrigeration units. The refrigeration units used for install at the roof top of van such as TR-110D,TRF-110D and TR-180T,TR-200T,TR-300T,TR-350T. The TR-110D,TRF-110D is powered by vehicle battery driven &
electrical van refrigeration units . The TR-180T,TR-200T,TR-300T,TR-350T are driven by vehicle engine.
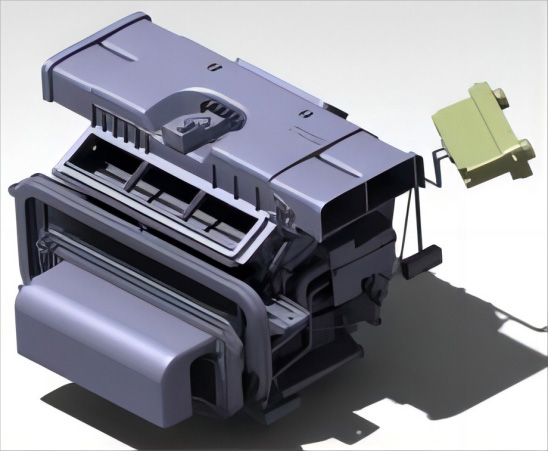
Ⅱ Evaporator installing
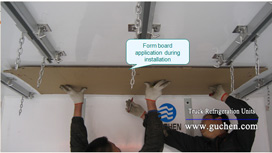
1. Use the cardboard as the evaporator model in order to easy installation, the evaporation is the key part of truck refrigeration unit.
2. Commonly we punch the evaporator hole from the bottom up, so the worker has to wear a eye-protecting glass.
3. Install the screws into the installation hole,fixed the nut, daub the water-proofing sealant on gaskets after evaporator installation to avoid of gas and water leakage.
Note: usage of the gaskets.
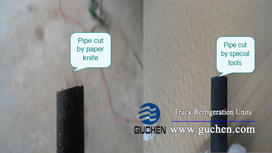
Ⅲ Pipes connecting
1. Cut the pipes with the special pipe cutter, which can ensure the evenness of the cut surface.
Because the wall paper knife can't cut the pipes even,and twice cut will have the polluted by the waste pipe debris. And inappropriate usage of the knife will also cause scratch.
2. Before install the pipe joint, check that if the model of the O-rings match it.
3. The pipe joint and the O-rings must be smeared with refrigerant oil. (The refrigerant oil has the function of lubrication and sealing).
4. When the pipes need passing by the vehicle engine, make sure the pipe is long enough, because the engine is shaking when working.
5. Keep pipes far away from engine exhaust pipe, avoid the aging pipes lead to explosion. If the pipes couldn't avoid to pass the exhaust pipe, make sure the distance is not less than 250mm and wrap the protective rubber around the pipes.
Ⅳ wire harness and wire slot installation
1. Align top of the wire slot with the bottom of the condenser.
2. Make sure the wire slot is in a vertical position, perpendicular to the condenser bottom. (Measure by a ruler)
Ⅴ Pulley installation
The pulley connecting the engine and the condenser, and driving the refrigeration units. Process the pulley as required dimensions:
Model A, groove width:13mm Angle:36 degree
Model B, groove width:15mm Angle:36 degree
If the pulley diameter is more than 200mm, the angle should be not more than 38 degree.
The engine pulley must be unified with the compressor pulley in dimensions. The screw must be tightened, check twice.
Tips: Smear the sealant on the screw when install the pulley to prevent it from loosing and dropping, for which might cause serious installation accident.
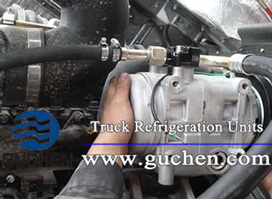
Ⅵ Compressor Bracket and Compressor Installing
Note:
1. Don’t place any materials around the engine (including tools, screws, iron sheets…), to avoid the vehicle was damaged
2. when install the compressor, please take care the engine and avoid the vehicle was damaged because of careless operation
3. Do not let the engine pump drive the compressor.
4. Because the compressor will be shake when it works. So you should be fixed the compressor bracket and installing the compressor on it and the screw must be tightened. (the compressor should be install the crossbeam of the compress bracket and deviation cannot be greater than 25mm ) When you weld the compressor bracket, it should be not out of shape.
Ⅶ Refrigerant Charging
Pumping air into vacuum state after confirming there has no leakage, then filling the refrigerant and debugging the truck refrigeration units system.
Ⅷ Trial run
1. use you hand turn the compressor clutch run, and before the trial the compressor clutch should be clockwise at least 10 times.
2. test run requirement: In winter, set temperature in -18 degree, then defrost manually. After the defrosting, begin the refrigeration (end of the trial run). In summer, set temperature in -5 degree, then defrost manually. After the defrosting, begin the refrigeration units. (end of the trial run).
Requirement: each unit need to have a test report in paper.
.jpg)